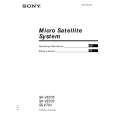
Nie masz w koszyku żadnych produktów
 
English Polski Spanish 
Szukaj instrukcji do
 

(e.g. AA-V20EG JVC, ZX-7 Sony )
PayPal 1000+ rating Secure, Encrypted Checkout.
 
Kto jest w sklepie?
Sklep przegląda 6043 gości 
Kategorie
Informacje
Polecamy
Strona główna >> MIELE >> DA239 Instrukcja Obsługi
 
 0 szt. w koszyku 

MIELE DA239
Instrukcja Obsługi


Tweetnij o tym produkcie a dostaniesz $1.00 rabatu!
  • Plik do pobrania
  • Format PDF
  • Kompletna instrukcja
  • Język: English
Cena: $4.99

Opis MIELE DA239 Instrukcja Obsługi

Kompletna instrukcja obsługi w formie pliku PDF. Plik PDF zostanie dostarczony na Twój adres email po jego zakupieniu.

Instrukcje obsługi (czasami nazywane także podręcznikiem użytkownika) opisuja funkcje i sposób działania danego produktu.

Instrukcja jest dostępna w następujących językach: English

Plik nie jest jeszcze gotowy
Musisz najpierw dokonać zakupu.

Recenzje produktu
Dla tego produktu nie napisano jeszcze recenzji!

Tekstowy podgląd strony 24 (kliknij aby zobaczyć)
Plywood backing
The majority of the weight of the installed Ventilation System will be supported by the motor assembly. Its mounting bracket must be firmly attached to the stud framing behind the drywall. If studs are not located in the required locations, a plywood backing (min. 1/ " (13mm) thick)
2

^ Find the studs to the left and right of the mounting location by tapping the wall or using a stud finder. ^ Mark the center of each of the studs with a vertical line. Be careful not to damage any wiring or plumbing that may be located behind the wall. Make sure that the power supply to the area being worked in has been turned off at the breaker panel before cutting into the wall. ^ Cut out the drywall along the marked lines and replace it with plywood of a matching thickness (min. 1/ " (13 mm)
2

spanning at least two studs must be installed. Failure to adequately support the weight as stated may result in the Ventilation System falling off the wall causing injury and property damage.

(If plywood backing is not needed, proceed to "Attaching the hood and motor assembly to the wall.")
To install a plywood backing board

thick). Tape the joints and refinish the wall. ^ To complete the installation proceed to "Attaching the hood and motor assembly to the wall."

^ Determine and mark the location of the motor assembly as outlined in "Attaching the hood and motor assembly to the wall." ^ Mark a horizontal line 3" (76 mm) above and 9" (229 mm) below the mounting screw locations.

24

Klienci kupując ten produkt kupili także

$4.99

SX-K700 TECHNICS
Instrukcja Obsługi

Kompletna instrukcja obsługi w formie pliku PDF. Plik PDF zostanie dostarczony na Twój adres email…

$4.99

CJ-V51 PIONEER
Instrukcja Serwisowa

Kompletna instrukcja serwisowa w formie pliku PDF. Instrukcje serwisowe zazwyczaj zawierają schemat…

$4.99

GRAND PRIX ELECTRONIC 754 BECKER
Instrukcja Serwisowa

Kompletna instrukcja serwisowa w formie pliku PDF. Instrukcje serwisowe zazwyczaj zawierają schemat…

$4.99

SX-PR602 TECHNICS
Instrukcja Serwisowa

Kompletna instrukcja serwisowa w formie pliku PDF. Instrukcje serwisowe zazwyczaj zawierają schemat…

$4.99

EV-S1000E SONY
Instrukcja Obsługi

Kompletna instrukcja obsługi w formie pliku PDF. Plik PDF zostanie dostarczony na Twój adres email…

$4.99

GRAND PRIX ELECTRONIC 780 BECKER
Instrukcja Serwisowa

Kompletna instrukcja serwisowa w formie pliku PDF. Instrukcje serwisowe zazwyczaj zawierają schemat…

$4.99

AG7330 PANASONIC
Instrukcja Serwisowa

Kompletna instrukcja serwisowa w formie pliku PDF. Instrukcje serwisowe zazwyczaj zawierają schemat…

$4.99

EVO-9850 VOLUME 1 SONY
Instrukcja Serwisowa

Kompletna instrukcja serwisowa w formie pliku PDF. Instrukcje serwisowe zazwyczaj zawierają schemat…
>
Parse Time: 0.4 - Number of Queries: 124 - Query Time: 0.13